

How To Change Facebook Album To Public
There are many reasons why you should brand your photos individual on Facebook. Aside from privacy concerns, the site is also teeming with unscrupulous scammers who want to take advantage of other people on the platform.
To bargain with this issue, Facebook has customizable settings that permit you to restrict access to your photos or hide your photos from others. You can set some to be viewable only by your friends or make them completely private and only viewable to yous.
Hither's all y'all need to know about how to make photos private on Facebook.
How to Make Your Facebook Photos Private
To make photos individual on Facebook, you tin alter the privacy settings of entire albums or individual photos. Of course, the easy fashion on how to hibernate photos on Facebook is the former, so nosotros'll start with that one.
How to Make Albums Private on Facebook
Y'all can change the privacy of an unabridged anthology on Facebook to salvage fourth dimension, rather than needing to brand photos private i past one.
However, you should remember that you tin but edit the audience of your photos—not pictures that your friends uploaded.
To make a photo album individual on Facebook, follow these steps:
- From your profile, go to the Photos tab.
- Then, discover the photos yous want to brand private under Albums.
- Get to the relevant anthology, then click the three dots in the top right corner.
- Select Edit. You'll run into a section that says "Friends" or "Public" with an icon showing ii people. Click that to change the audience of your album.
- From here, you tin can control who can view the anthology. Select Only Me if you do non desire anyone else but you to see this album and make it private.
- So tap the back pointer and click Save (desktop) or Done (mobile). This will hide all photos in your Facebook album.
If you don't desire to brand the photos completely private and still want to share them, just with a more limited audience, you can choose the audition options for Friends, Friends except, or Specific friends.
If you desire to bear witness the album only to a grouping of friends on a sure list, select Prove Lists and choose the list you desire to share the album with.
How to Make Individual Facebook Photos Individual
You can too change the privacy of individual photos on Facebook to brand them private.
It'southward important to remember that you can merely change the privacy settings of certain photos within some groups or albums. These include:
- Photos of you lot
- Uploads
- Profile photos
- Cover photos
- Timeline photos
- Mobile photos
Photos uploaded in batches forth with others and as part of an album will follow the settings of the anthology.
To brand a single photograph on Facebook private, follow these steps:
- Get to your profile and click the Photos tab. And then select the photo you want to brand private. Click the three dots in the peak right corner.
- Select Edit privacy.
- Alter the privacy setting to But Me to hide the photograph from your timeline and brand information technology private.
- Your new privacy settings volition automatically save.
You can likewise choose other audience options if you lot don't want to completely hibernate the photograph and just want to make it less public.
Who Can See My Photos on Facebook? How to Check
If you lot want to double-check the privacy of your photos, y'all can view your public profile on Facebook. This is the profile that people who aren't your friends tin can encounter.
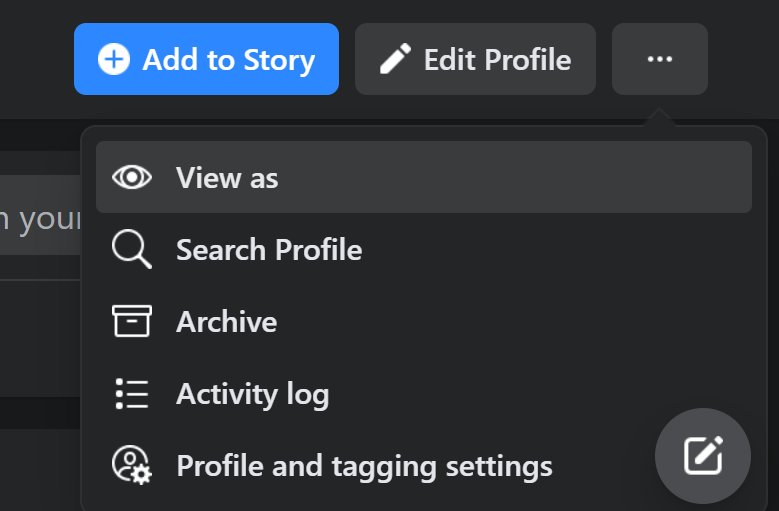
To practise this, you'll use the "View As" feature on Facebook. You lot can admission information technology on both the Facebook website and the app.
To enter this mode, become to your profile. Select the three dots adjacent to Edit Profile to open a dropdown carte du jour, and so select View Every bit.
This volition show yous all the previous posts that people outside your Facebook friends list and the platform can encounter. You tin can not change the privacy settings while you're on the View As manner, but you can have notation of the photos and the dates, so you can observe them later.
In one case y'all know which photos you lot want to set to private, leave View As public mode past clicking on your thumbnail in the top right corner of your screen or clicking dorsum. Alternatively, tap Exit View As.
On mobile, tap the hamburger card at the acme (Android) or lesser (iOS) and select See your contour. Side by side, tap the iii dots next to Edit Profile and select View As to enter View As fashion.
The next time y'all post a photograph, the privacy settings will automatically follow the final settings y'all set for a photo. So, if y'all set a previous photo to "Only Me", it will be the default audience setting of the side by side photograph you upload.
To alter the audience settings of the photo you are about to upload, click on the audition settings button. Y'all will notice it beneath your proper noun.
From hither, you tin modify the mail audience, then click Done to go back to your post. When yous want to share the photograph, select Post.
Always check this button before you lot upload or post anything on Facebook. You should do this just to make sure y'all are not accidentally sharing photos or information with people outside the platform and outside your friends' listing.
Also, regularly bank check your profile in View As mode to encounter if yous may have accidentally shared annihilation with the public.
Doing this cheque regularly volition help make sure you catch any of these photos right away. Call up that the longer these photos are shared publicly on social media, the higher the chances of a scammer getting a hold of it.
Reviewing your social media accounts and changing the audience settings of your photos to individual is a good cyber hygiene practice. It will not only protect your data but will besides protect the privacy of your loved ones who may be in the pictures you upload.
E'er call back that there are unscrupulous hackers and scammers who are looking for ways to take advantage of other people.
About The Author

Source: https://www.makeuseof.com/how-to-make-photos-private-on-facebook/
Posted by: fosdickgagainfoute.blogspot.com
0 Response to "How To Change Facebook Album To Public"
Post a Comment